
How to animate Shader Graph using Timeline or code. While there isn’t support out of the box, using timeline for shader graph will make controlling your shaders easy and fun.
One of the key reasons to make a shader is in creation of an animating effect. Today I’ll cover how to use Timeline to animate a shader graph. Shader graph animation with timeline is not too difficult, but surprisingly not covered elsewhere on the internet that I could see.
In this tutorial, I’ll show you how I set up the code needed, and I’ve also put that code up on github here. In the process of showing you how the setup, I’ll also show you how to animate shader graphs from code.
This article is tied to a video version, which can be found here.
Animations without input
So far, most of my videos and written tutorials have relied on the Time node in shader graph for animation. I’ve created inputs, but they’ve always been set statically in the material. Any movement was done by Time.

For continuous looping effects, this is great. But for any effect that needs to have a clear start and end, Time just won’t cut it. Here you need to be able to trigger an input to start moving from one point to another.
Today’s Shader Graph
Before getting into how to drive a shader graph from timeline, I need to make one. In the interest of time, I’ll start with the shader graph from my shockwave tutorial. This tutorial used time to animate a ripple of energy out from a central source. There are a few graphs in there, but the last one that animates the vertices is what I’ll use.
Of note, for this tutorial I also updated from Shader Graph 8.2.0 up to 10.2.2.

For this demo I’ve decided to animate a helmet in a more 3D kind of way, which requires two slight changes to the graph. If you like this helmet, it’s from Infinity PBR here.

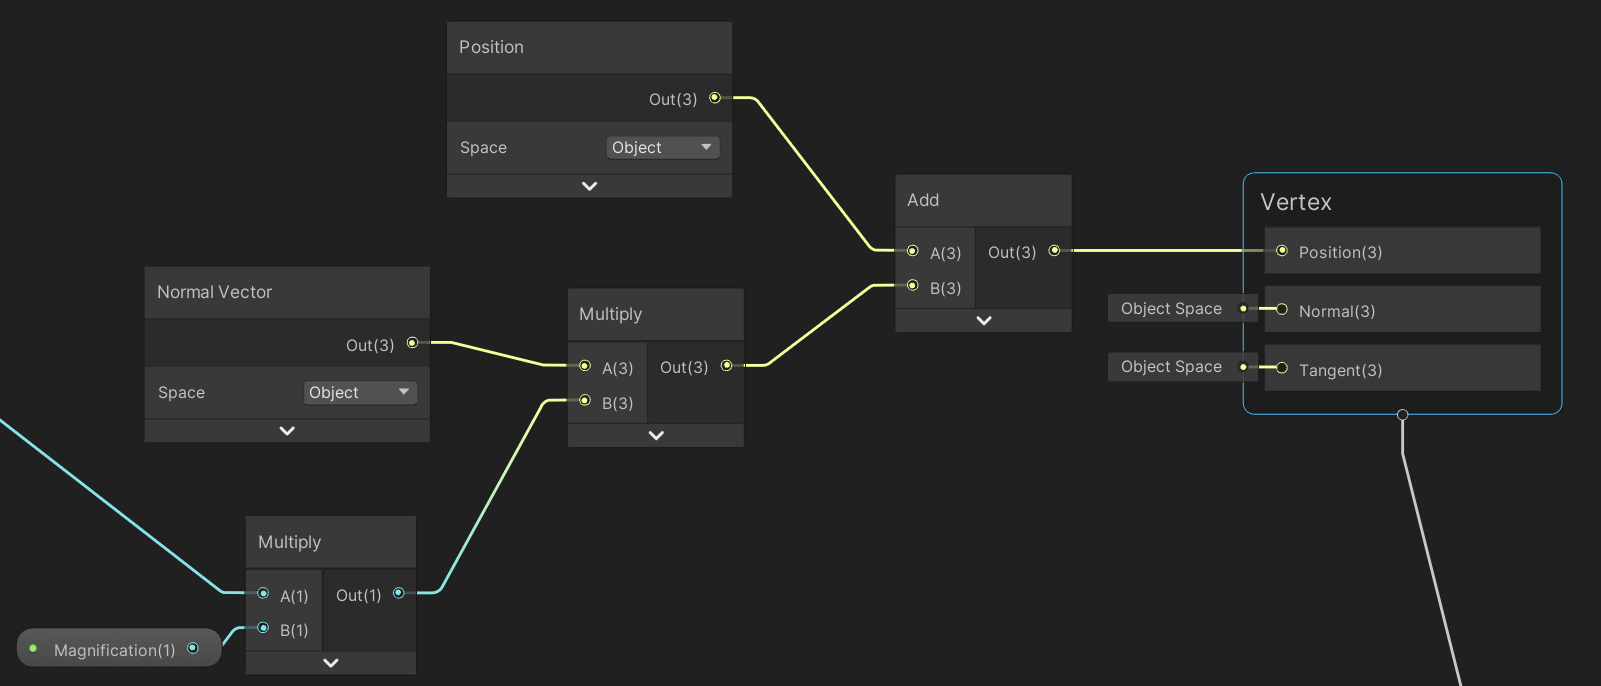
The first change is to swap from a Vector2 FocalPoint to Vector3 (and remove some unnecessary nodes in the direction block.

Second, I’m going to change the ripple from pushing out in the Y direction, to pushing out in the direction of the normal vector. This gives it the ability to ripple outwards no matter which part of the model we’re on.
Inputs you can control
Now, to actually change this from a time-controlled graph to one we can control from code or timeline.
Simply create a float input (Vector1 if on shader graph 8.x) and feed that in where the time used to be.

It’s critical to set the Reference on this input. By setting the name, we can control these inputs on the material inspector, but we need the Reference to control them at runtime. The naming convention tends to be that the Reference is the name of the input, starting with an underscore (_).
If using Shader Graph 8.x the Reference is set within the blackboard. If using 10.x, it’s set within the Graph Inspector.

Shader Graph Animations with Code
So, to drive this from timeline, you’ll have to write some code (or download it from my github). As such, I want to quickly explain how to animate shader graphs from code before getting to the timeline part.
Select the GameObject you are animating and add a new component. I’ve called mine HelmetTrigger. In the code, we’ll grab the material during start, and use a user-set Duration variable to work out how long to animate this.
The one line of code that is actually important for you to note is _Mat.SetFloat("_Control", _Percentage);
With this line, I am taking the material of the renderer, and calling SetFloat. That, along with its matching methods such as SetVector or SetColor, are the interface between code and shader graph. The first parameter is the Reference we set on the input to the graph. In this case “_Control”. The second parameter is the actual value to set it to.
The full code is below.
public class HelmetTrigger : MonoBehaviour
{
    public float Duration = 1;
    private Material _Mat;
    private float _Percentage;
    private bool _Fired = false;

    // Start is called before the first frame update
    void Start()
    {
        if (TryGetComponent(out MeshRenderer renderer))
            _Mat = renderer.material;
        else
            Debug.LogError("this is a disaster");
    }

    // Update is called once per frame
    void Update()
    {
        if (_Fired)
        {
            _Percentage += Time.deltaTime / Duration;
            _Mat.SetFloat("_Control", _Percentage);
            if (_Percentage > 1)
            {
                _Percentage = 0;
                _Fired = false;
            }
        }

        if (Input.GetKeyDown("space"))
        {
            _Percentage = 0;
            _Fired = true;
        }
    }
}
With this code, every time you hit the space bar, the effect will start over, update every frame, and finish Duration seconds later.

Shader Graph Animations With DOTweenPro
Before going on to Timeline, I want to add a quick aside that you can also, in some cases, use DOTweenPro to drive shader graph inputs. This is actually what I used when making the shockwave video in the first place.
DOTweenPro can’t drive arbitrary shader inputs, but it can drive the color of a material. In code this is Material.color. The way you can take advantage of this, is that if you make the shader graph input of type color, and Reference “_Color”, it’ll actually be set by Material.color.
So for something like this, you could have DOTweenPro drive the color from black to red, and use the R channel of the input in place of time. It’s a bit hacky, but I felt it worth mentioning briefly.
Shader Graph Animations with Timeline
Now onto the important part. All told there are four code files to create. I’ll cover what each is below, but as mentioned, they are also on github with a sample project here.
Timeline code
You’re going to need two files used in the editor, and two that will be for the runtime. I’ll go through them in complexity order.
ShaderPlayable
The first class is a runtime data holder. Depending on how you extend Timeline, this class can do more, but for us it just needs data (FloatVal), and will be used by the running game.
public class ShaderPlayable : PlayableBehaviour
{
    public float FloatVal = 0;
}
ShaderControlAsset
The second class is the editor-pair that goes with our above data. It holds the data as you set it in the editor (FloatVal), and has the code needed to create the runtime data holder (CreatePlayable).
public class ShaderControlAsset : PlayableAsset
{
    public float FloatVal = 0;
    public override Playable CreatePlayable(PlayableGraph graph, GameObject owner)
    {
        var playable = ScriptPlayable<ShaderPlayable>.Create(graph);

        ShaderPlayable runtimePlayable = playable.GetBehaviour();
        runtimePlayable.FloatVal = FloatVal;

        return playable;
    }
}

ShaderTrack
Third is the timeline track. This asset is the actual track added onto the timeline. Each track can hold a collection of ShaderControlAsset’s.
[TrackClipType(typeof(ShaderControlAsset))]
[TrackBindingType(typeof(Renderer))]
public class ShaderTrack : TrackAsset
{
    public string ShaderVarName;
    public override Playable CreateTrackMixer(
        PlayableGraph graph, GameObject go, int inputCount)
    {
        var mixer = ScriptPlayable<ShaderMixer>.Create(graph, inputCount);
        mixer.GetBehaviour().ShaderVarName = ShaderVarName;
        return mixer;
    }
}
The two attributes before this class tell timeline that the track can hold ShaderControlAsset’s and that the track will operate on a Renderer.
The important data piece here is the ShaderVarName. Tracks can hold data, and in our case the track will have two things: A Renderer from which to grab the material, and a string name of the shader variable. Note that this name must be the _Reference in the shader graph, not the variable name itself.
Beyond that, the track doesn’t do much other than create an instance of our last class, the ShaderMixer.

ShaderMixer
The last class to make is the runtime logic piece. This is what will take the multiple ShaderPlayable’s and mix them together based on how the parts of the track are overlapping.
public class ShaderMixer : PlayableBehaviour
{
    public string ShaderVarName;
    public override void ProcessFrame(
        Playable playable, FrameData info, object playerData)
    {
        Renderer rend = playerData as Renderer;
        if (rend == null)
            return;

        int inputCount = playable.GetInputCount();
        float finalFloat = 0;
        for (int index = 0; index < inputCount; index++)
        {
            float weight = playable.GetInputWeight(index);
            var inputPlayable = (ScriptPlayable<ShaderPlayable>) playable.GetInput(index);
            ShaderPlayable behavior = inputPlayable.GetBehaviour();

            finalFloat += behavior.FloatVal * weight;
        }

        Material mat;
        if (Application.isPlaying)
            mat = rend.material;
        else
            mat = rend.sharedMaterial;
        mat.SetFloat(ShaderVarName, finalFloat);
    }
}
This is the longest class, but there isn’t all that much giong on here either. It loops all the “inputs” on the track, using each one’s weight to get the current value.
With that result, it’ll set it on the material using the Set* APIs we talked about earlier in this tutorial. The isPlaying logic is used because Timeline can be previewed outside of play mode. If you aren’t playing, it’s best to not access the .material on a renderer.

Additional edits on Github
The version of the code up on github is a little more complex than what I showed above. Primarily in that the data can hold a FloatVal, Vector4Val, and ColorVal. Then, on the track itself, you pick which type to use. I go into this on the youtube version of this tutorial, or you can simply look at the sample project to see how it’s used.
Timeline setup in the editor
With that code in place, we can now make Timeline tracks to animate the shader graph.
Create an empty GameObject in the scene, select it, and open Window->Sequencing->Timeline. Hit Create in the Timeline window and save the asset wherever you’d like.
Now right click in the Timeline window and select “Shader Track”. This shows up in the options because of our code in ShaderTrack.cs. Drag the thing you want to affect onto the track’s object picker. The code is set up to handle an object with a MeshRenderer or a SpriteRenderer. Select the track, and enter the name of the shader variable. If you are using the code from the github, you also need to select the variable type.
Now right click on the track itself and select Add Shader Control Asset. This too is there due to our code existing in the project. Set the values you wish on this, create a few more, drag them around, and you now have Timeline animating shader graph!

Timeline over
That wraps up my overview of using Timeline to drive Shader Graph. You can now animate shader graphs with timeline, or with code (or maybe even DOTween Pro).
Please check out my YouTube channel, and subscribe!