
It’s 103F (40C) where I live today, so it felt right to create a tutorial on how to make a heat haze shader graph. Heat haze is the deformation and sometimes blurring of the air around hot things. I think the science behind it has something to do with water vapor, but we won’t worry about that.
Party people
All around me
Feeling hot hot hot
– The Merrymen
This effect is almost always used as a full screen effect (or post processing effect), and often in 2D games. For info on setting up full screen effects in any of Unity’s renderers, see my post on that.
This post is my first simultaneous YouTube & written post. The video version doesn’t go into quite as much detail as the written post, but is easier to digest. (YouTube link in case embed is broken)
This article may contain affiliate links, mistakes, or bad puns. Please read the disclaimer for more information.

The youtube video and screenshots in this article utilize the following asset store items: free dragon, not free dragon and not-free but super awesome Gaia 2. Below I also use art from this free pixel art pack.
Heat Haze Shader Graph
This shader graph effect is going to do two things. The first is to deform our shapes, or “wiggle our pixels sideways” to use technical terms. In many instances this is enough. In our case, we’ll go ahead and blur things a little afterwards as well, just to be safe. The thing to keep in mind is that it’s easy to over due this effect. Too much heat haze can hurt your eyes, like staring at a magic eye too long.
To better show the evolution of the shader, I’m going to start by doing this on a 2D sprite that is just vertical stripes. Setting it as the default texture input to my heat haze shader graph means I can do almost all of the work on this graph without leaving the graph editor.
Trading Heat for Water
It’s worth mentioning that if you don’t add the blur, a heat haze effect can easily be modified to work as an underwater shader effect. Essentially the key difference is the size of the vertical aspect of the wiggle. For example, in the sine wave case below, a lower frequency looks like water, and a higher frequency looks like heat. In the noise example beyond that, it’s the CellDensity that can make things look like water.
Exploring the Math
To deform our image, all we do is add or subtract a small amount from the x coordinate we feed into our sampler. This results in the fragment shader pulling a nearby color left or right.
To start, I do this by running a sine function on the Y UV coordinate.

To animate it, I simply subtract Time, multiplied by a scalar to affect speed. This animates the waves upwards. That’s the most common direction heat haze goes, though you could have scenarios where you want it to animate out of something.

This gives us a very simple heat haze effect. We can make it a lot better, but it’s a good starting point.
////these three inputs are the main knobs to tweak based on your use
//float _Strength = 0.001;
//float _Frequency = 100;  <-- lower numbers here look like water.
//float _Speed = 0.25;

float sineNoise = sin(_Frequency * iTexCoord.uv.y - _Time * _Speed);
float offset = sineNoise * _Strength;

float2 coord = iTexCoord.uv;
coord.x += offset
return tex2D(_MainTex, coord);
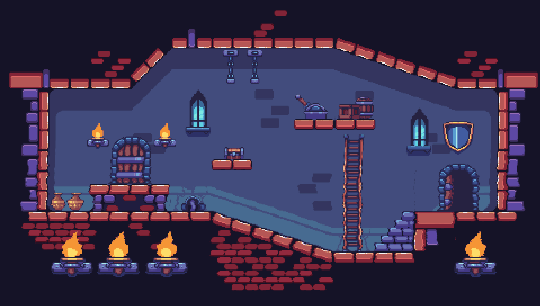
Applying this haze to my dungeon.

Voronoi Heat Haze Shader
The above code is about as simple and cheap as you can get for heat haze. The next step in upping the quality is to remove the sine, and add in a noise method. I’m going to use Voronoi noise because it looks good in this context, and because Unity provides us with that node out of the box.
Functionally this is the same as we had above, just changing the offset logic.
////these three inputs are the main knobs to tweak based on your use
//float _Strength = 0.005;
//float _Speed = 0.125;
//float _CellDensity = 50;  <-- lower numbers here look like water.
//float _AngleOffset = 30;
//float _AngleSpeed = 10;

float2 noiseUV = iTexCoord.uv - float2(0, _Time * Speed)
float angle = _AngleOffset + _SinTime * _AngleSpeed;
float noise = Voronoi(noiseUV, angle, _CellDensity);
float offset = noise * _Strength;

float2 coord = iTexCoord.uv;
coord.x += offset
return tex2D(_MainTex, coord);
Breaking that down into a graph, I’ll start with the offset calculation. Most of the work is done by the Voronoi node, and tweaking the inputs. So it’s a fairly straightforward graph.

I take that offset, and add it into the x component of the UV’s to get the final product. One shader graph trick I’ll point out here, I have two UV nodes. They are identical, and I could have just had one that drove the two places that value was needed. Using two instead makes for a much cleaner graph. You can also do this with inputs (use them in multiple spots).

In a gif, it’s hard to tell how much better the noise is than the sine wave, but trust me it is.

Stay in the Hot Zone
Before I get to the blur step, there is one more optional feature that can help the heat haze look like heat and not water. That’s to constrict it to part of the screen (or sprite). In the case of this dungeon, something like the bottom half would work well.
To do that, we simply multiply the offset value by a smoothstep.
offfset *= smoothsetp(1 - iTexCoord.uv.y, 0.45, 0.6);

Blurring the Shader Graph
The last step is optional because it’s the most expensive. And because it doesn’t always look good. Heat haze (like many effects) can easily be too overpowering. Adding blur to it makes it even stronger. If you were making a game matching this dungeon image I’ve been using, the blur is a good idea if the heat comes in a burst due to some event. But if the heat is on all the time, and the player is potentially walking through it, the blur may end up just hurting your players eyes. Blur is also good if the effect is done on background, or smaller areas. If for example, I had put it on the individual torch flames of this dungeon, the blur would be a good touch.
Here I blur the output color horizontally. Normally, to get a good looking blur, you use two passes. One to blur in a first direction (say, X), and a second pass to blur the other direction (Y). Since this effect is only a horizontal wiggle, it works well to only blur horizontally. This makes it a relatively cheap blur, but still not nearly as cheap as the effect is without it.
To do the blur, take the coord used previously, and not only sample the texture with it, but also add & subtract from the x, and sample again. Then do a weighted average. If you want an even better blur, you do two or more samples to each side. For this demo, one on each side gets the job done.
//the same smoothsetp I used on offset previously...
float smooth_Y = smoothsetp(1 - iTexCoord.uv.y, 0.45, 0.6);
fixed4 mainColor = tex2D(_MainTex, coord);
fixed4 leftColor = tex2D(_MainTex, coord - float2(0, 0.003));
fixed4 rightColor = tex2D(_MainTex, coord + float2(0, 0.003));
fixed4 blurColor = mainColor * 0.5 + leftColor * 0.25 + rightColor * 0.25;
return blurColor * smooth_Y + mainColor * (1 - smooth_Y);

Why did I say this was expensive? Those Sample nodes. Sampling a texture is far more expensive from a hardware performance perspective than almost any math you may do in a shader.

Shader Graph on a 3D Scene
To add this effect to my 3D scene doesn’t involve too much. Following the instructions in my full-screen shader tutorial gets the shader set up on the scene. From there it’s more about tweaking settings than anything else.
The one change I made to the shader itself was that I changed the smoothsetp(1 - iTexCoord.uv.y, 0.45, 0.6); calculation. The new one I used was:
float smooth = 1 - smoothstep( length(iTexCoord.uv - float2(0.5,0.5)), 0.3, 0.45);
This makes it so there’s a circle of haze in the middle of the screen and nowhere else. Since my screen is wide, the circle is wide, which works well in this instance.

Conclusion
All in all, heat haze is a relatively cheap and easy effect. One that I’ve used in a few 2D games I’ve made. I chose to do it now as it’s been useful to me, and it seemed like a good fit for my first YouTube & blog post combo. If any of you like the combo please let me know on Twitter or in the comments of the video. And since it’s a new channel, please subscribe.
References
Asset store items used in demo:
Do something. Make progress. Have fun.
2 comments on Heat Haze Shader Graph How-To
Comments are closed.